Hi Everyone
Ok Some may not be aware but this is my 2nd attempt at this post, somehow tonight whilst doing another post I lost this previous one entirely, the one that most were waiting for. grrrrr
Ok here goes- :-)
When I was putting this album together I also had our team's next JAI Scrapbooking challenge in mind-
Just Add a mini album or a Scrapbooking gift for Christmas.
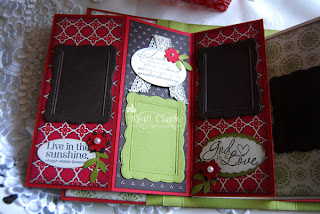
This Milk Carton Mini Album will hold 12 photos in all. In my design they are all portrait orientation. I have used the Designer Frames as my photo backing.
Here is a storyboard I had on display at our recent STampin Up day- HeartFelt Event- Brisbane Qld, Australia on Nov 17 2012. It gives not only measurements and scoring details of this project but also the stamps and punches that I have used as well as some of the embellishment ideas.
. It was the last of the Heartfelt events to do the rounds of the nation and New Zealand. I had the opportunity to be one of the 4 class presenters- my topic Handmade Gifts. This Mini Album was the last of my presentation.
Here are the various pages- the structure of the album is made up of 3 pieces of cardstock, scored into thirds, and adhered together as seen by photo examples
Below are my scoring and meansurement templates.
Here below are the actual album section- 7 1/2" x 5 3/4" or 19cm x 14.5cm.
I cut 3 at this size- 2 in Real Red and 1 in Very Vanilla SU cardstock, scored into thirds .
Here below is the outside cover of the mini album. You'll see by the photos above that I have added DSP- Candlelight Christmas panels.
The Milk Carton Packaging is made from the flocked window sheets in the Designer Paper Series- Candlelight Christmas.
This album makes an easy project, everything has been sorted for you great for various occasions ie. A year in review- good pressie for grandparents, nice and portable for those with limited space too, a baby's 1st year, School Years- a good way to showcase those annual wallet sized school photos- kindy to yr 12, a Memiore of a loved one, a 18th, 21st or other significant milestone birthday, a graduation of school or career course, a hobby collection, a holiday keepsake- the list and reasons go on.
I've made the design simple enough, kept the embellishments similar and consistent added little stamped sentiments, lace and pearls. I'm yet to add the photos but think that black and white work best as they will then work with any patterned paper and not make your work appear 'busy'.
Well this is my 2nd time to publish this post the previous completely lost, I suggest coping this if you want to save it for later, you can't trust these net/computer systems LOL!
My apologies if you clicked on this link in the last hour. If anyone has any questions feel free to drop a comment or email me.
I truly hope you have found the review of my presentation in whole inspiring and if so why not leave a little word, its always nice to know and appreciate ones' followers.
Have a great week
Enjoy- Ruthyl


Your are a genius and your work is beautiful as usual. Thanks for sharing. I just love what you do. Love Kayxx
ReplyDeleteWow, this is absolutely stunning. The detail is beautiful. What a special keepsake.
ReplyDeleteThis is really great, to see it so detailed. I saw you at Heartfelt and was busy taking notes, but when I went to create it, I couldn't remember how it folded together. Thank you very much for posting this. I admire your work, tho I don't always comment. hugs Colleen Blakey
ReplyDeleteThanks Colleen for taking the time to give feedback, really appreciated. All the best with your project :-)- Ruthy
ReplyDelete