Tuesday, November 27, 2012

Measurement Amendment for Mini Album

Hi Everyone

For those trying to construct the Milk Carton Mini Album that I recently posted  I've discovered that I've given a incorrect measurement in inches though right in the metric. I generally work in inches and obviously got muddled in the process of moving back and forth from inches and metric., My sincere apologies. In reflection it won't muck the design but just make your mini album shorter, making less room for embellishments and you'd like to avoid that where possible.

So the size for the actual body of the mini album is 7 1/2" (19cm) x 5 3/4" (14.5cm)
 (I had put 5 1/4" instead- this is wrong) ***Note the meausurements in large bold lettering.


I say its always a good idea to try things out in reflex paper first in case human behind project has made stuff up LOL!

**Please note I have gone back to the original post and amended that info there too as well.

All good now. I'm currently designing another mini album idea building on the principle of this one so stay tuned for the share :-)

Have a great week everyone,

EnjoyRuthyl

Sunday, November 25, 2012

The Grand Share- Brisbane Heartfelt Event

Hi Everyone
Well I've had a little bit of play with some digital collages and thought it would be a good way to sum up and reflect overall on Stampin Up - Heartfelt Event- Brisbane November 17th 2012.

Not only am I sharing my work but others that I managed to captured throughout the day.
Hope to leave you inspired!

Click to play this Smilebox collage

Click to play this Smilebox collage

Click to play this Smilebox collage


Click to play this Smilebox collage


Click to play this Smilebox collage

Click to play this Smilebox collage


Click to play this Smilebox collage
Create a picture collage


Well that completes the overview of Heartfelt Event - Brisbane, hope you enjoyed the photo laden share.

EnjoyRuthyl

Saturday, November 24, 2012

Just Add a mini album or a Scrapbooking gift for Christmas.

Hi Everyone

Ok Some may not be aware but this is my 2nd attempt at this post, somehow tonight whilst doing another post I lost this previous one entirely, the one that most were waiting for. grrrrr

Ok here goes- :-)
When I was putting this album together I also had our team's next JAI Scrapbooking challenge in mind- 

Just Add a mini album or a Scrapbooking gift for Christmas.


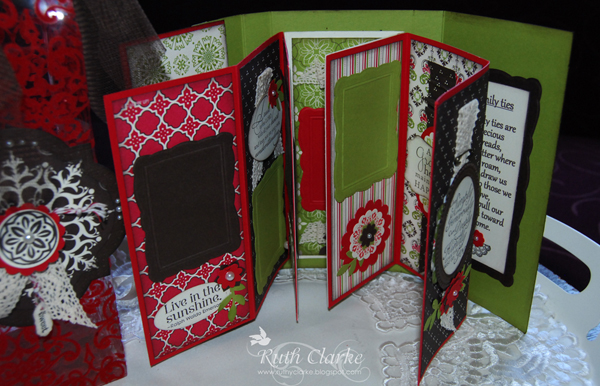
This Milk Carton Mini Album will hold 12 photos in all. In my design they are all portrait orientation. I have used the Designer Frames as my photo backing.

Here is a storyboard I had on display at our recent STampin Up day- HeartFelt Event- Brisbane Qld, Australia on Nov 17 2012. It gives not only measurements and scoring details of this project but also the stamps and punches that I have used as well as some of the embellishment ideas.


. It was the last of the Heartfelt events to do the rounds of the nation and New Zealand. I had the opportunity to be one of the 4 class presenters- my topic Handmade Gifts. This Mini Album was the last of my presentation.

Here are the various pages- the structure of the album is made up  of 3 pieces of cardstock, scored into thirds, and adhered together as seen by photo examples


Below are my scoring and meansurement templates.
Here below are the actual album section-  7 1/2" x 5 3/4" or 19cm x  14.5cm. 
I cut 3 at this size- 2 in Real Red and 1 in Very Vanilla SU cardstock, scored into thirds .


Here below is the outside cover of the mini album. You'll see by the photos above that I have added DSP- Candlelight Christmas panels.
The Milk Carton Packaging is made from the flocked window sheets in the Designer Paper Series- Candlelight Christmas.


This album makes an easy project, everything has been sorted for you great for various occasions  ie. A year in review- good pressie for grandparents, nice and portable for those with limited space too, a baby's 1st year, School Years- a good way to showcase those annual wallet sized school photos- kindy to yr 12, a Memiore of a loved one, a 18th, 21st or other significant milestone birthday, a graduation of school or career course, a hobby collection, a holiday keepsake- the list and reasons go on.

I've made the design simple enough, kept the embellishments similar and consistent  added little stamped sentiments, lace and pearls. I'm yet to add the photos but think that black and white work best as they will then work with any patterned paper and not make your work appear 'busy'.
Well this is my 2nd time to publish this post the previous completely lost, I suggest coping this if you want to save it for later, you can't trust these net/computer systems LOL!
My apologies if you clicked on this link in the last hour. If anyone has any questions feel free to drop a comment or email me.
I truly hope you have found the review of my presentation in whole inspiring and if so why not leave a little word, its always nice to know and appreciate ones' followers.
Have a great week

EnjoyRuthyl


Its a Team Effort

Hi Everyone

Continuing on with our recent Heartfelt Event share I've got a few photos of my gorgeous team. These girls are awesome, not only are they great mates but are wonderful together too, they make me proud to call them friends. They are encouraging to one another and also to myself,  who like them,  is on a continual developing, creative journey. I was so happy that most could make it along on Saturday  and we did miss our other girls Maureen and Rhonda, fortunately I get to catch up with them quiet often and bring them up to speed on things.

So here we are-
Pictured:- Debbie, Janet and I
Debbie, Janet and I 
Debbie and her sister Katherine as a Guest
Janet and I - friends for more than 20 years, who have shared many a creative moment together.
Front:- Debbie, Kate, sister Amie (guest) 
Back row- Janet and I.

Janet took a photo of my presentation display and I 
(you can see several templates on the board, others were added at the final of my last session)


My display

Here goes................... 


This last Heartfelt Event of the 2012 was the last leg of the journey as these projects, first launched at Canberra SU convention, traveled around  to each of the state and NZ events and finally to my home town where I was able to collect and take them home. (I must add that the 'Baby Onsie' with the summer smooches butterfly is not one of my projects but of some other clever demo.)

Here's some other shots of them as well- 

There were several items not on display as at convention due to the some materials retiring since the launch.

In the lead up to this event each demo and guest was asked to make themselves a personal name tag.
After weeks of balancing family, day job and late nights creating our name tags didn't get done until the night before......yikes.
Here is what Janet and I came up with. Mine had a sewing theme and Janet's featured butterflies and matched her outfit beautifully.


Here is Janet's
Hope your having a great weekend, perhaps with the opportunity to get creative!

EnjoyRuthyl


Wednesday, November 21, 2012

Scrapbook Gallery- Heartfelt Event- Brisbane

Hi Everyone

A quick post as I'm working through the recent Heartfelt Event News.

Shortly after convention this year several of both Australian and NZ demonstrators were 

asked for some scrapbook layouts to add to the board displays at the Heartfelt Events 

travelling around both countries. 

Here are my  3- 


Here are some photos as they were displayed with my demonstrator peers


EnjoyRuthyl


SAB Sneek Peak

Hi Everyone
During our recent Heartfelt Stampin Up Event in Brissie, several of the presenters, myself included got to have a  use some of the  up and coming product to be released in January 2013.

I love the fresh look of these papers and 1/4" satin embossed ribbons. To me the selection of product spoke of Country Cosy which influenced my idea of Boxed Cookies Gift set.

Going a little backwards in my presentation of particular project order as this was the final project I shared during my presentation.

First I made some cookies (using basic biscuit foundation - ie. Jam Drops without the jam LOL!)
Check that recipe out here

I rolled out my biscuit pastry and used my new Stampin Up Biscuit Presses. Most seeing these in real life are amazed on the decent size. Because I didn't have a round biscuit cutter to I used a egg ring, so that gives you an indication on real size. ( the purpose of making these cookies before hand was to show relevance for this handmade gift)


The cookie Presses come in a set of 3 with the wooden handle. I suggest keeping your cookie press dusted in flower before you press it into your cookie dough each time. The silicone cookie presses wash up very easily in warm soapy water, do not wet the wooden handle of course. I used the purple press from this set. These can be found in the main annual stampin up catalogue.


I package them in a plastic -gusset style bag, secured to keep the freshness with a cute satin bow.


I trimmed my Party Favour Box with some of the sneak product DSP using some Multipurpose adhesive sheet from Stampin Up. I've decorated the front of the box with the Stamp - Friendship Preserved and heat embossed with Sugar and Spice scented embossing powder.


I also teamed this project with a matching card that I formed using the Bigz Two Tags die- I simply placed a piece of folded cardstock along the long edge of the tag die just before the outside cut line.
Here is the finished card and the inside.

 the full ensemble


Well I trust you have been inspired by another share from my Brisbane Heartfelt SU presentation- Homemade Gifts.

Enjoy- Ruthyl


Monday, November 19, 2012

Make It Homemade

Hi Everyone

Here is another continuance of my presentation projects from Brisbane Heartfelt Event last Saturday 17th November. 

It was a great day such wealth of creativity in the rooms and on the boards, in later posts I'll have a photo share of those displayed.

In this post I'll share the rest of my fabric featured projects before moving on towards the papercraft versions. It is fair to say that I married the two in almost all my items, with barely a sewing machine involved and definitely easy sewing skills, that anyone can achieve.

These items I'd have to say I think were my personal favourites and appeal to my vintage tastes and love for all things sewing notions.


Sewing Notions- gift boxed
To Make this Gift Box I used:
  • 2 sheets of cardstock- 12" x 12" (30cm x 30cm) (Lid in Crumb Cake and box bottom in Soft Suede)
  • 3/4 of a Mtr of Crumb Cake Tulle for bow on box lid
  • 3 wooden cotton reels in graduating sizes (found at local craft store) - inked and sponged with Soft Suede 
  • 3 short lengths to wrap around reels of - Cotton ribbon (currently in holiday catalogue)- I have run the stamp wheel design - In Stitches over the cotton tape before sticking around the cotton reel, crochet lace trim and Soft Suede taffeta ribbon around the other smaller size reels.
  • Designer frame and mini brads (in current holiday catalogue)
  • Stamp sets- Delicate Doilies and Established Elegance - dress form and "Modes..Aux Elegants"  wording
  • Hello Doily- stamped on window sheet with versamark, embossed with white embossing powder and trimmed around shape attached to box with glue dots.
  • Vintage Faceted Buttons and Pearls - Jumbo to multi size pack.
  • Beau Chateau Designer Fabric (Pink spot)
  • Other- DK brown and Lt pink felt- flowers cut from Fun Flowers and Original Blossoms Big Shot dies.
Hello Doily Stamp
Delicate Doilies Stamp set
Established Elegance Stamp Set
Beau Chateau Designer Fabric


How to  the construct box:

  1. Following the score guidelines on the templates shown below-
Lid of Box-Template-  score lines and Cutting measurements
Adhere red sticky strip on the reverse side of the most outer edge on all 4 sides.

Bottom of Box - Template- Score lines and Measurements

Before you assemble the lid of the box together -stamp randomly all over it with various stamps from the stamp set - Delicate Doilies, stamped in versamark for a subtle effect. I also spritzed the lid using the spritzer tool with a Soft Suede Writer on the brush end. Finally assemble the box and ink around the edges with your ink sponge using Soft Suede Ink.
 Decorate the box with the materials and stamps mentioned above using the photograph as reference.


 Sun Bonnet Sue Hat Pin Cushion
I made this using a chipboard shape cut from the Scalloped Circle Bigz Shot Die and an empty glue dots chipboard ring for the bonnet part of the hat. Cut circle fabric large enough for both to be able to draw in with gathered thread to the centre of both pieces and then hand stitch together the two pieces together, finish off the hat brim with ribbon, lace and crumb cake tulle. I've added some felt flowers, Vintage Faceted button and a jumbo pearl.

 The Petal Cone Snips Pouch 


Using the Bigz Petal Cone Die, I cut a piece of DSP backing cardboard to large enough size to cover the die required, first with a sheet of multipurpose adhesive sheet and then some Beau Chateau designer fabric, ran it through the big shot and also cut two additional half circles, again covered in fabric before hand. The project is decorated with crocheted lace trim and tassels and assembles using red sticky strip. Finished off with some felt flowers as in the other matching projects. 


This above project was made using the Bigz circle scallop die. Before running the fabric through the big shot I ironed some Pellon thin wadding to the wrong side of the fabric, run it through the big shot and run a stitch around the edge with contrast colour, fill with toy fill just before you close the opening. You could add a ribbon loop if you wanted to use it as a scented sachet  I've used it here as an alternate style pin cushion. You could also fill a shape like this with potpurri or lavender.


Any fabric or vintage lover would love to have this as a Handmade gift.

Hope you enjoyed this other segment from my Heartfelt Presentation in Brissie.
Next Post more from Brisbane Heartfelt event and templates etc.

Enjoy - Ruthy